With your new WaterSmart landscaping plans complete, demolition and turf removal done, and your new irrigation system in place, it’s time to get started on the plant installation. For most homeowners, this is the most rewarding part of the process seeing your new landscaping come to life.
https://www.waternewsnetwork.com/wp-content/uploads/2024/04/WNN-Horizontal-White-Blue2.png00Mike Leehttps://www.waternewsnetwork.com/wp-content/uploads/2024/04/WNN-Horizontal-White-Blue2.pngMike Lee2022-08-01 10:02:092022-08-01 10:10:42Plant Installation Brings Your New WaterSmart Landscape to Life
Successfully installing WaterSmart Living irrigation starts long before you get out your tools. You need to complete an assessment of your landscape plan’s specific water needs, draw a complete plan showing the layout, then select your irrigation and purchase your irrigation equipment. If your soil needs amendments (and it almost certainly does), you must get this done first. With all of this important prep work complete, you can start to implement the design.
Successfully installing WaterSmart Living irrigation starts long before you get out your tools. You need to complete an assessment of your landscape plan’s specific water needs, draw a complete plan showing the layout, then select your irrigation and purchase your irrigation equipment. If your soil needs amendments (and it almost certainly does), you must get this done first. With all of this important prep work complete, you can start to implement the design.
Five key steps to success
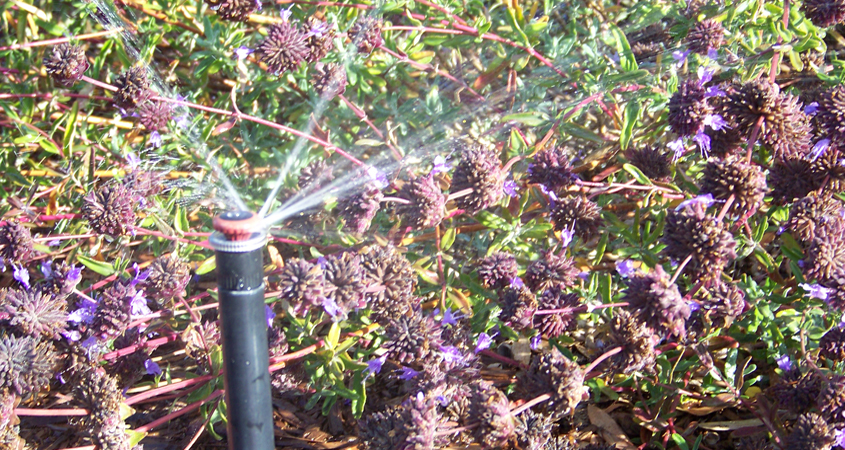
Be sure your irrigation plan considers hills and slopes to prevent waste and erosion. Photo: Pixabay
Step 1: Read the instructions from the manufacturer and familiarize yourself with all the parts of your new irrigation system. Often the manufacturer will provide YouTube video demonstrations which can be extremely helpful.
Step 2: Starting from the main connection to the water line, dig trenches for all the pipes according to your irrigation plan. Ideally, the main connection to the water line will be downstream of the water meter and upstream of the connection to the house.
If you tie into a rear yard hose bib, be aware that the water pressure will be lower because the water for your house is regulated by a separate pressure regulator.
Step 3: Lay an extra pipe sleeve or two under any new hardscape elements. This allows you to add pipes or wires in the future. Be sure to cover the ends of the pipe with duct tape before covering and mark the location on your landscape plan.
Step 4: If you are using drip irrigation, you may want to hold off installing your drip emitters until after planting is complete. With your new plants in the ground, you can place the emitters precisely where the water best irrigates your new plants. Be sure to place them at least six inches away from the plant’s stem to prevent rot.
Step 5: Consult your local irrigation supply store or the major irrigation manufacturers if you need more detailed installation guides or help with troubleshooting. Manufacturers offer toll-free customer service phone help, online chats, and email.
(Editor’s Note: The San Diego County Water Authority and its 24 member agencies offer programs, resources, and incentives to improve water-use efficiency for residential, commercial, and agricultural users. WaterSmart choices are a way of life in the region. Stay WaterSmart San Diego! For more water-use efficiency resources, go to WaterSmart.SD.org.)
https://www.waternewsnetwork.com/wp-content/uploads/2022/07/Irrigation-Drip-845X450.jpg450845Gayle Falkenthalhttps://www.waternewsnetwork.com/wp-content/uploads/2024/04/WNN-Horizontal-White-Blue2.pngGayle Falkenthal2022-07-25 08:28:222022-07-25 08:28:22Installing WaterSmart Living Irrigation
Once you’ve finalized your landscaping plans, you’ll have some demolition work ahead of you, including the existing turf you plan to remove or replace. Removing turf presents choices about the best way to accomplish this task. Learn more about turf removal options and understand the steps before you begin.
Once you’ve finalized your landscaping plans, you’ll have some demolition work ahead of you, including the existing turf you plan to remove or replace. Removing turf presents choices about the best way to accomplish this task. Learn more about turf removal options and understand the steps before you begin.
Start here with this video demonstrating your turf removal options
Reclaiming an area of unwanted turf requires diligence. No matter what method of turf removal is used, plan on routine maintenance, including weeding or herbicide application, as often as every two weeks for the first three months after your take your turf out. Some tenacious warm-season grasses might give you a battle for even longer.
Options for Turf Removal
Natural turf removal. A natural way to remove turf and preserve the soil’s ecology is to strip the turf and water the area for the next two weeks to encourage grass to re-sprout and hand pull all new growth.
Sheet mulching. Rather than removing turf and taking it to the landfill, you can compost it in place. First, remove several inches of turf and soil from the edges near your hardscape. Wet the turf area and cover it with several layers of newspaper. Water again and cover with cardboard. Water again and cover with three inches of shredded mulch.
If you can invest the time, allow several months for the soil microbes to decompose the turf and turn it into friable soil for plants.
Solarization. Another alternative is solarization. This works best in the spring or summer. Turf areas are covered with rolls of plastic. Sun exposure heats the soil and kills the turf and weed seeds. The cover must be airtight with no holes and left in place for six to eight weeks. However, this method will also kill beneficial soil microbes. Using this method, you must follow up and apply compost or other soil amendments to restore the soil’s healthy biology.
Turf removal with herbicide. If you choose to use an herbicide, consult with your local landscape supply store and read the manufacturers’ label for best use practices and safety considerations. Since Bermuda grass and some other grasses are dormant in the winter, they must be treated when actively growing in the remainder of the year (May to October).
Grading. When the turf is removed, you need to grade your property. Set the soil level to direct water away from the house. To help slow down water runoff from your garden, try creating small depressions away from structures, walls, or paving where water is allowed to pool and slowly percolate into the soil. The more you slow the water down or hold it on site, the more you improve water quality in your area and downstream at local beaches.
Reduce runoff. Runoff carries with it soil particles and pollutants. Reduce runoff by using mulch.
Prep For Success
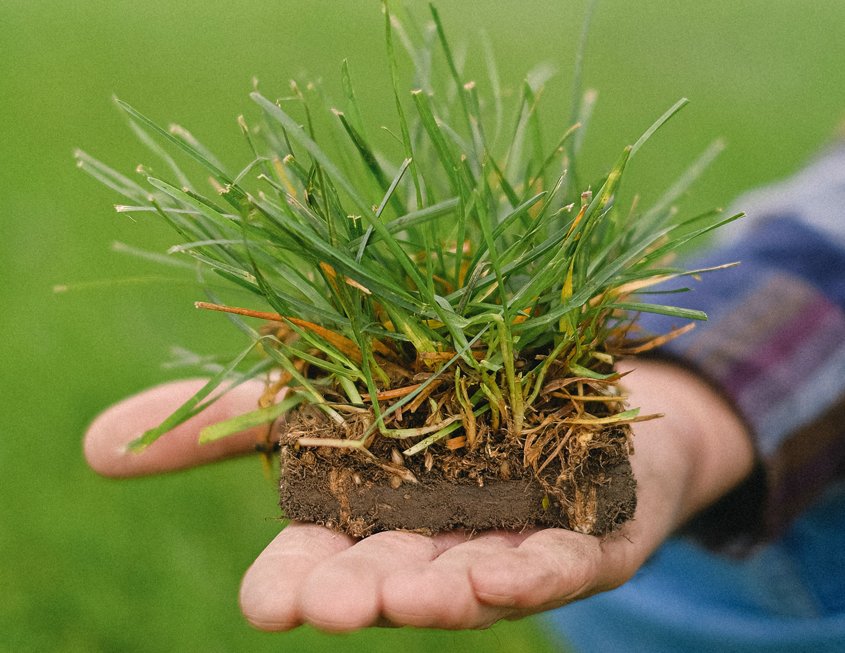
Remove your old turf in a way that preserves valuable soil microbes. Photo: Anna Shvets / Pexels
Now that you have removed unwanted turf and other plants, it is time to condition your soil.
Soil amendments should be selected based on your soil analysis recommendations. Till them into the top layer of soil. Compost (15-30% by volume), gypsum, and fertilizer are typical amendments in arid climates like San Diego County.
The goal is to achieve healthy soil containing microbes which feed plants, improve drainage, and increase the natural water holding capacity of the soil.
(Editor’s Note: The San Diego County Water Authority and its 24 member agencies offer programs, resources, and incentives to improve water-use efficiency for residential, commercial, and agricultural users. WaterSmart choices are a way of life in the region. Stay WaterSmart San Diego! For more water-use efficiency resources, go to WaterSmart.SD.org.)
https://www.waternewsnetwork.com/wp-content/uploads/2022/03/dirt-lawn-shoes-MKDigitalProducts-845X450.jpg450845Gayle Falkenthalhttps://www.waternewsnetwork.com/wp-content/uploads/2024/04/WNN-Horizontal-White-Blue2.pngGayle Falkenthal2022-07-18 08:01:382022-07-18 08:01:38Best Options For Turf Removal
Irrigation is an essential part of any good landscape design. It ensures plants and trees get the water they need to thrive without wasting a drop. Once you know how much water your landscape plants require, it’s time to take a closer look at your irrigation system.
Whether you are working with a professional designer or are doing the project yourself, the following checklist will help you keep track of the main design decisions involved in irrigation design.
Start with this informational video about WaterSmart Living Landscape irrigation
Evaluate your existing irrigation system and determine if it can be maintained in its current condition or if you need to upgrade it. Some irrigation systems can be upgraded by changing nozzles, converting to drip emitters, or adding a smart controller, while others may need to be completely redesigned.
Irrigation options fall into categories
High-efficiency irrigation is the most efficient method to deliver water to plants is low-flow irrigation. It delivers water from the valve through a filter and then through a network of lateral pipes and sometimes flexible tubing, to the individual emission devices such as drip emitters, in-line drip emitters, or bubblers. Pressure compensating devices are always the most efficient option.
Low flow irrigation is a good choice for trees and shrub areas and should be used in any landscaped areas next to hardscape and in areas less than eight feet wide to prevent runoff from overspray. When using drip emitters, reduce maintenance and ensure long-term durability by selecting good quality tubing and designing for at least two emitters per shrub.
Moderate efficiency irrigation is the next most efficient types of irrigation include rotating or low precipitation (typically for spaces eight to 30 feet in size). These nozzles are a better choice than conventional spray heads for watering turf because they have a lower application rate – they water slowly. Your watering times will increase, but these sprinklers do not produce mist, and they apply water at a rate turf can absorb it, reducing runoff.
Low-efficiency irrigation. The least efficient types of automatic irrigation include conventional spray irrigation and impact rotors. These types of high precipitation irrigation distribution systems generally apply water faster than the soil can absorb. Installing a new system with low-efficiency irrigation is not recommended. If you have an existing conventional spray system, you can easily retrofit it with new low precipitation nozzles.
Get smart with a smart controller
This new landscape includes a drip-irrigation system, rotating nozzles, and a smart irrigation controller to schedule efficient water use. Photo: Otay Water District
Upgrade to a smart controller, an automatic controller (also called a timer or clock) is either weather-based or has historical weather data included as a reference. Some systems allow for adding a weather sensor or moisture detection system that automatically adjusts your watering schedule in response to current weather or soil moisture level.
Smart controllers can turn off your sprinklers when it rains and increase the frequency and/or duration of watering in hotter weather. Locate the controller in a place that is easy for you to access, such as the garage.
Verify your new landscape water use
WaterSmart landscape irrigation aims to apply water as efficiently as possible. This means using low flow drip or bubblers whenever possible and in areas with overhead sprays, providing the correct pressure and equipment layout to ensure even coverage to maximize efficiency.
Once you have determined what type of irrigation you would like to use, divide your yard into zones and note what kind of irrigation you plan to use in each zone. Contact some of the major irrigation manufacturers to obtain an irrigation design guide to help you with the specifics of your irrigation layout. Some irrigation manufacturers even offer free irrigation design services.
It is important to double-check to make sure your design meets the target landscape water use after installation. You may need to adjust the design to meet your target to maximize water savings.
(Editor’s Note: The San Diego County Water Authority and its 24 member agencies offer programs, resources, and incentives to improve water-use efficiency for residential, commercial, and agricultural users. WaterSmart choices are a way of life in the region. Stay WaterSmart San Diego! For more water-use efficiency resources, go to WaterSmart.SD.org.)
https://www.waternewsnetwork.com/wp-content/uploads/2019/07/Smart-Irrigation-Month-EfficientWatering-845X450.jpg450845Gayle Falkenthalhttps://www.waternewsnetwork.com/wp-content/uploads/2024/04/WNN-Horizontal-White-Blue2.pngGayle Falkenthal2022-07-11 08:00:182022-07-11 13:28:06Irrigate Your WaterSmart Landscape Like a Pro
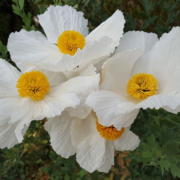
Once your WaterSmart Living Landscape design starts coming together, pick your plants for each water-use category to ensure you meet your WaterSmart water conservation goals. Focus on local native plants or plants from similar climate regions.
https://www.waternewsnetwork.com/wp-content/uploads/2024/04/WNN-Horizontal-White-Blue2.png00Mike Leehttps://www.waternewsnetwork.com/wp-content/uploads/2024/04/WNN-Horizontal-White-Blue2.pngMike Lee2022-07-05 09:51:432022-07-05 09:52:57How to Pick Your Plants for a Successful WaterSmart Landscape
When designing a living, water-saving landscape, you want your new outdoor space to fit your house, your neighborhood, and your lifestyle. Finding that fit begins by asking a few basic questions. First, how do you want to use your space? It’s possible to significantly improve your home’s water efficiency and meet your lifestyle needs at the same time.
https://www.waternewsnetwork.com/wp-content/uploads/2024/04/WNN-Horizontal-White-Blue2.png00Mike Leehttps://www.waternewsnetwork.com/wp-content/uploads/2024/04/WNN-Horizontal-White-Blue2.pngMike Lee2022-07-05 09:50:442022-07-05 09:53:07Designing a Living, Water-Saving Landscape to Fit Your Lifestyle
When undertaking a water-saving landscape renovation, strive to continuously feed as much organic matter as possible to the landscape soil to keep it healthy. Start with compost and mulch to jump-start the process. Eventually, your plants will feed themselves with their own leaf litter.
Once your WaterSmart Living Landscape design starts coming together, pick your plants for each water-use category to ensure you meet your WaterSmart water conservation goals. Focus on local native plants or plants from similar climate regions.
Let this video help you choose the right plants for our Mediterranean climate
Once you’ve chosen your plant types, there are additional important considerations.
Design for mature plant size: Allow enough space for the plants you select to grow to their full size to avoid overcrowding or the need for excessive pruning.
Growing conditions: Select plants suited for your microclimate, soil type, and drainage to achieve optimum plant growth.
Even the strictest drought restrictions allow for watering trees on residential and commercial properties. Photo: Otay Water District
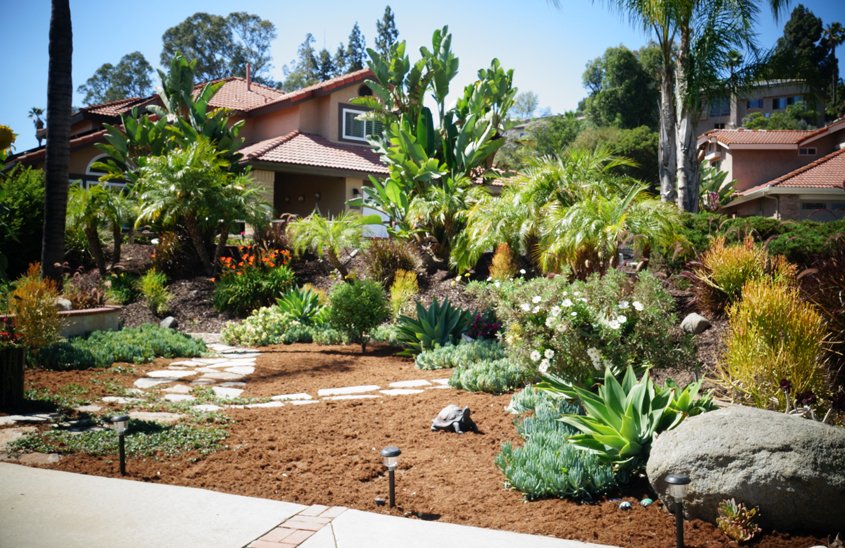
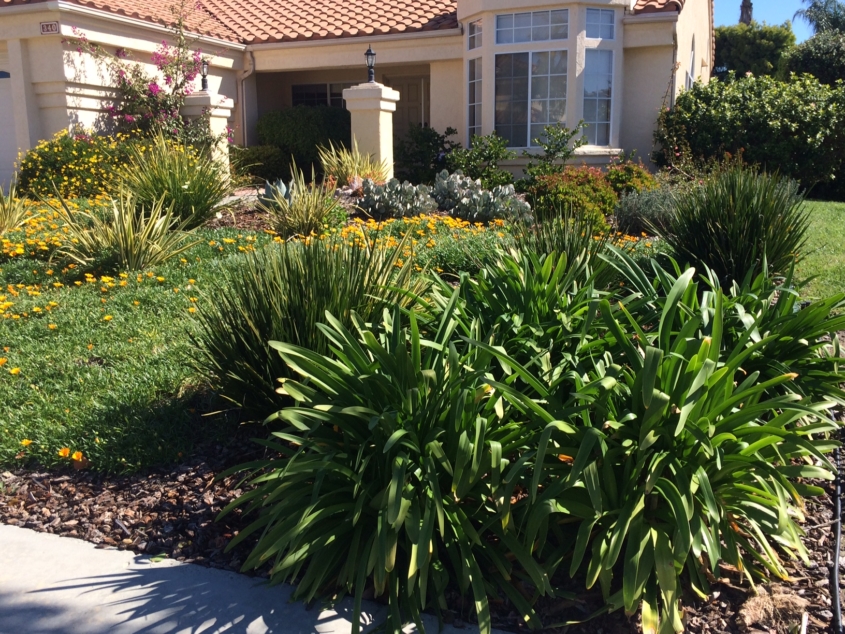
Tree placement: Typically, a planting design will include a tree or two for shade. Placing a deciduous tree on the south or west side of your home will shade your house during the summer to keep it cool and allow more light and sun exposure in the winter. Keep trees at least 10′ from foundations. In fire hazard areas, trees should be placed, so the mature canopy is at least 10 feet away from any structures.
Shrub placement: Shrub and groundcover planting is typically designed with various heights. Medium size (three to four foot) shrubs are usually placed closer to the house to create a “foundation” or backdrop. Smaller shrubs are then placed in front of the foundation planting and low groundcovers in the area closest to the sidewalk or street.
Accent shrubs can provide a unique texture, color, or flowers. Place them so they provide interest and focus views on locations in the landscape. Highlight your entrance walk with special accent plants. This places a higher emphasis on your entry, which is where you want visitors to be directed.
Be bold and have fun. Don’t be afraid to express your individual tastes.
Using water features and higher water use plants
Determine water use before choosing plants for your new sustainable landscaping. Photo: San Diego County Water Authority
Water has been a precious resource throughout history in arid regions of the world. This perspective has been integrated into Mediterranean landscapes by using water only in the most important areas.
If you have some high water use plants you particularly want to include, they can be used. Strive to include no more than 10% high water use plants or water features in your landscape, so choose carefully.
Hyrdozones and water-efficiency
If you choose to include plants not classified as very low or low water use, be sure to group these moderate or high water use plants together. Grouping plants of similar water use together, known as planting in hydrozones, makes it easier to irrigate efficiently by letting you concentrate additional water only where it is needed.
Higher water use plants should be on a separate irrigation valve so you can water them differently than the rest of the garden.
Mediterranean landscapes also historically used water features for a pleasant and calming sound. The water area of the fountain will lose water at about the same rate as cool-season turf grass or another high-water use plant. By minimizing the square footage of open water, a water feature can fit well into the WaterSmart landscape.
Minimizing turf use
Limit the amount of turf in your design as much as possible. If you choose to incorporate turf, consider a warm-season turf that uses less water than traditional cool-season turf. Warm-season turf such as Hybrid Bermuda or UC Verde Buffalo Grass thrives in the hot months of the year and naturally go dormant in winter. Another less thirsty grass to consider is Carex praegracilis or California Field Sedge.
(Editor’s Note: The San Diego County Water Authority and its 24 member agencies offer programs, resources, and incentives to improve water-use efficiency for residential, commercial, and agricultural users. WaterSmart choices are a way of life in the region. Stay WaterSmart San Diego! For more water-use efficiency resources, go to WaterSmart.SD.org.)
https://www.waternewsnetwork.com/wp-content/uploads/2020/12/matilija-poppies-kimberly-rotter-845X450.jpg450845Gayle Falkenthalhttps://www.waternewsnetwork.com/wp-content/uploads/2024/04/WNN-Horizontal-White-Blue2.pngGayle Falkenthal2022-07-05 07:49:492022-07-05 07:49:49How to Pick Your Plants for a Successful WaterSmart Landscape