Plant Installation Brings Your New WaterSmart Landscape to Life
With your new WaterSmart landscaping plans complete, demolition and turf removal done, and your new irrigation system in place, it’s time to get started on the plant installation. For most homeowners, this is the most rewarding part of the process seeing your new landscaping come to life.
Review the following tips to help you through the plant installation and placement process
Step 1: Use a garden hose to outline groundcover areas to help you visualize the design before you start the installation.
Step 2: Set the plants while still in their containers, in their approximate location per your planting design plan. Take a step back and review. View your plant placements from various angles. Make any adjustments to the design now to avoid having to dig up and relocate any plants.
Be aware many drought-tolerant landscapes look sparse for the first few years. As your plants reach their mature size, they will fill in over time. Be sure to allow proper spacing to allow each plant to grow to its full size.
Step 3: Dig plant holes twice the width of the plant root ball and just deep enough to bury the roots. Water the hole before placing the plant. When planted, the top of the root ball should be even with or slightly above soil level.

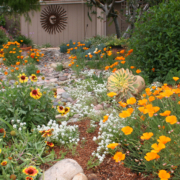
Colorful, water-wise plants replaced a thirsty, labor intensive front lawn in Deborah Brant’s winning 2019 landscape makeover. Photo: Vista Irrigation District
Step 4: Once in the hole, the plant should be packed firmly into place with the original, compost-amended soil from the hole. Extra dirt can create a berm around the plant to hold water.
Step 5: Cover the planting area with a two- to three-inch-deep layer of mulch. Keep mulch a few inches away around the plant stems to prevent rot. Using mulch has many benefits. It can help suppress weeds, enrich the soils, protect plant roots from compaction, provide a finished look to your garden, and mulch conserves water.
Step 6: Monitor your garden to ensure your plants are getting adequate water. Even native plant species and drought-tolerant plants need water to get established. This can take a year. To minimize your watering needs while your plants are getting established, install your landscape in the fall months before the months of most significant rainfall in San Diego, generally December through March.
______________________________________________________

(Editor’s Note: The San Diego County Water Authority and its 24 member agencies offer programs, resources, and incentives to improve water-use efficiency for residential, commercial, and agricultural users. WaterSmart choices are a way of life in the region. Stay WaterSmart San Diego! For more water-use efficiency resources, go to WaterSmart.SD.org.)