Take a Test to Determine Your Soil Type
If you put a shovel into the ground in San Diego County, you are likely to encounter the region’s impermeable soil structure. Impermeable soils are defined by poor infiltration areas. This means water doesn’t flow through the soil to replenish groundwater, because the soil is too dense.
Having impermeable soil also means water does not soak evenly into the ground or flow through living soil to plants in a healthy way. No matter where you plan your landscape, you should concentrate on improving your soil structure. That will help you irrigate more efficiently and cost-effectively, and your plants will receive the nutrients and water they need to flourish. It is relatively easy to improve your soil structure, but first you need to determine what kind of soil you have.
Particle size matters
The three basic types of soil are:
Clay: Soil made up of the smallest particles
Silt: Soil made up of a mixture of particle sizes
Sand: Soil made up of the largest particles
In general, sandy soils drain faster than clay soils, because there is more space between the larger particles. Soil structure also influences the quality of the soil. Lifeless, compacted, sandy soil will not absorb water, while healthy clay soil will be more sponge-like, holding and releasing water. The “best” soil – an even blend of sand, silt and clay – is called loam.
Find your soil structure by testing your soil
Some tests can be done onsite to figure out what kind of soil you have. Others might require lab analysis. Certain other conditions require specialized tests, such as soil used for food production or soil receiving a lot of storm water.
You can test your home landscaping soil yourself using a “Jar Test.” This is a fun project to do with kids or as a family.
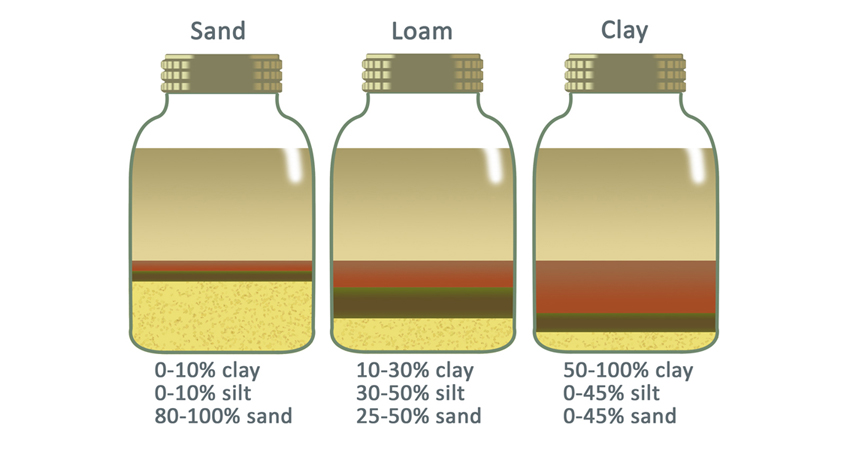
Use this graphic as an example with which to compare your jar. Try to get the most even distribution, as shown with the loam jar. Image: San Diego County Water Authority
How to do the “Jar Test”
- Use a one-quart glass container.
- Add one cup of soil from the garden. You can select one area or take samples from several areas and blend them together.
- Add three cups of distilled water.
- Close the jar and shake it until all the soil solids are suspended in water. Put the jar on a shelf and wait 24 hours.
- If the container is still cloudy, wait another 24 hours. After 48 hours, the soil layers should be settled on the bottom.
- Measure the layers in proportion to each other, with the total adding up to 100%. Sand will be on the bottom, silt in the middle, and clay on top.
- Refer to the graphic to determine your soil type, based on the proportions of sand, silt, and clay. Which jar does your home sample look most like?
Now you can work to improve your soil condition, providing the best possible foundation for your landscaping plants and the most efficient irrigation.
The San Diego County Water Authority and its partners also offer other great resources for landscaping upgrades, including free WaterSmart classes at WaterSmartSD.org.